
Boosting Performance by Rendering 3D at a Lower Resolution
Introduction
Performance is a critical aspect of mobile game development. Mobile devices not only have less power than desktop or console platforms but also have limited battery life. Even if a game runs at 60fps on a mobile phone, if it’s not optimized, it can consume more battery than necessary, resulting in a suboptimal player experience.
In a previous blog post, we discussed how mobile devices often have small, high-density screens. For instance, a 7″ mobile phone with a 1080×2400 resolution updates a total of 2.592.000 pixels every frame. However, these pixels are so tiny that rendering them all may not noticeably improve the perceived graphic quality.
To address this issue, Ramatak has contributed a new feature to the Godot engine: the scale factor for 3D content. This feature allows you to set an arbitrary downscale value so that all the 3D content is rendered at a lower resolution, thereby improving performance. The UI elements will still render at the same resolution to prevent any loss of definition.
Prerequisites
To follow this tutorial, you don’t need much:
- Basic understanding of 3D.
- Godot demo projects which can be downloaded from here
Make sure to switch to the 3.5 branch of the godot-demo-projects repository since we’re still using that version of Godot at Ramatak.
Preparing the project
For testing purposes, we will use the Global Illumination demo. To get started, import it into Godot.
Let’s begin by making some small changes to the UI to see the effects of the new feature. In the test.tscn scene, add a Label node and name it FPS. We’ll use this label to display the current frames per second (fps) of the game.
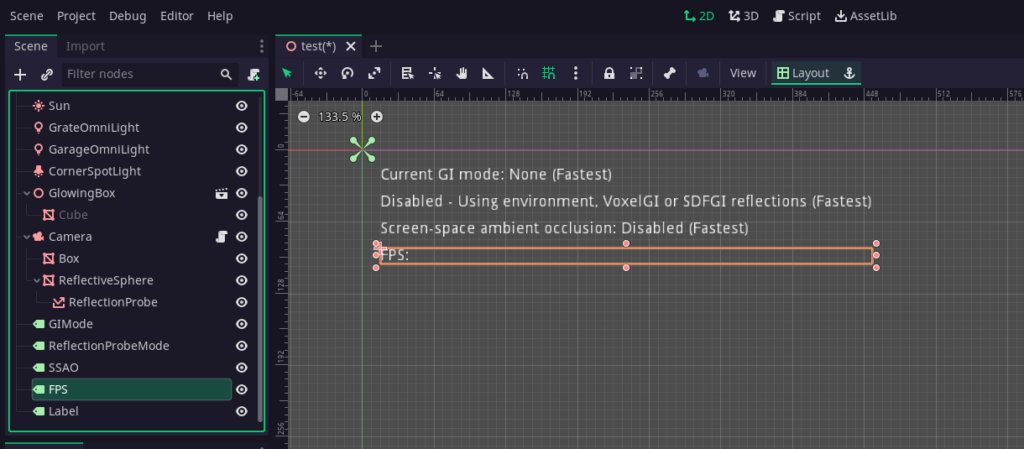
Next, add the following code to the test.gd script to update the label with the fps value:
func _process(_delta):
	$FPS.text = "FPS: %d" % Engine.get_frames_per_second()
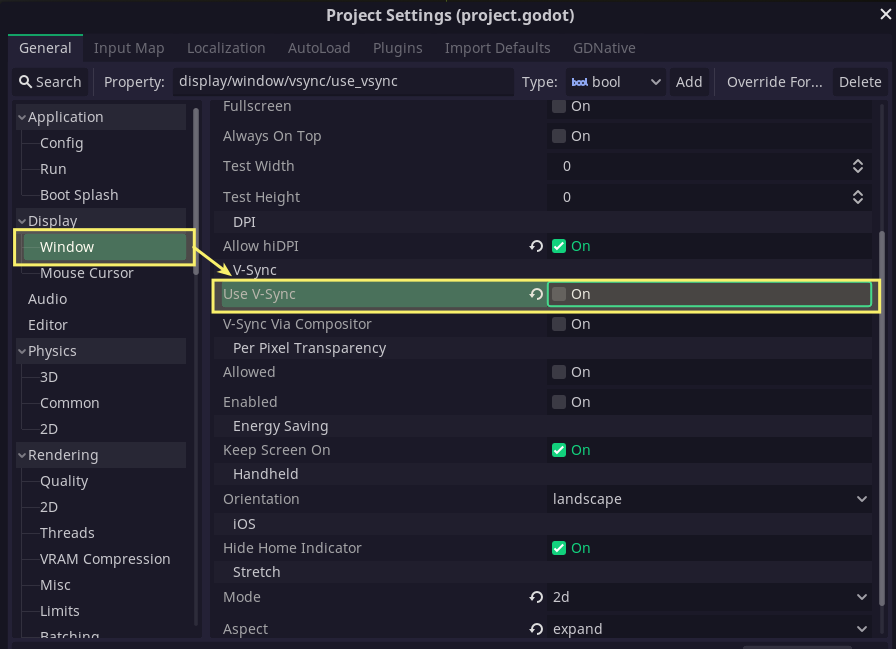
Additionally, disable the VSync setting in the Project Settings. If you don’t disable it, the game will be capped at 60fps, and it’s possible you won’t see any improvement.
Now, run the game on your phone or mobile device to observe the current fps. Make a note of the fps value for later comparison.
Changing 3D resolution scaling from project Settings
Using the new feature is simple: open the Project Settings and select the Rendering category. From there, click on Quality and locate the Resolution Scale option within the 3D section.
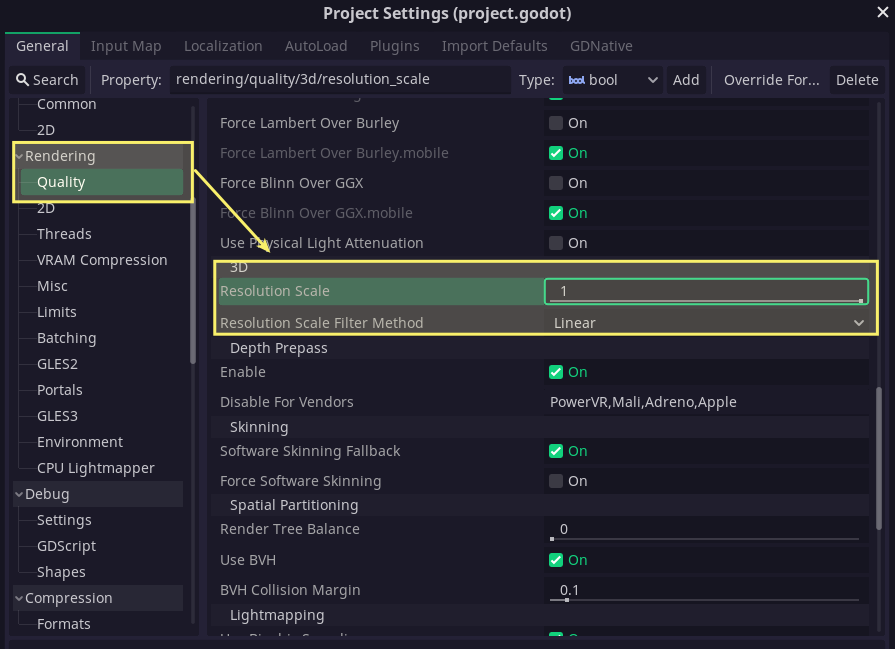
You can see the effects of this setting directly by opening any 3D scene. The viewport of the editor will display the content rendered at a lower resolution. In the following image, the resolution scale is set to 0.25:
Set the Resolution Scale to 0.5 in the Project Settings. This value scales the width and height of the 3D resolution, causing the game to render only 1/4 of the original pixels.
Additionally, you can change the Resolution Scale Filter Method from Linear to Nearest. This changes the interpolation method when sampling the value for each pixel.
If you are not familiar with these terms, the former is like having the filter option enabled when importing a texture, while the latter is like having it disabled.
Run the game on your device again and observe the FPS value. It should have increased now that the Resolution Scale is below 1. In my case, I obtained the following results on my low-end phone:
This means we achieved approximately a 20% FPS increase by lowering the 3D resolution to 75%!
| Resolution Scale | FPS |
|---|---|
| 1 | 43 |
| 0.75 | 52 |
| 0.5 | 61 |
You can override this setting using the mobile tag. Select the Resolution Scale setting, and press the button “Override For” at the top right. Then choose the “mobile” option.
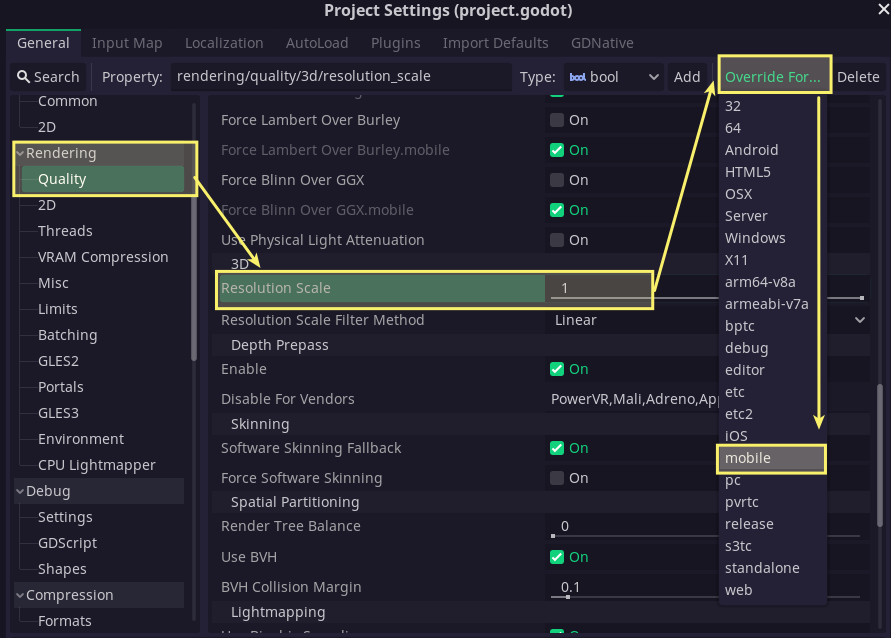
A new setting called Resolution Scale.mobile will appear. You can use it so that the game gets upscaled only on mobile platforms.
Changing resolution scale on runtime
To change the resolution scale at runtime, we can use the ProjectSettings object in a script.
ProjectSettings.set_setting("rendering/quality/3d/resolution_scale", desired_value)
This allows us, for example, to add in-game options to reduce the scale and improve performance.
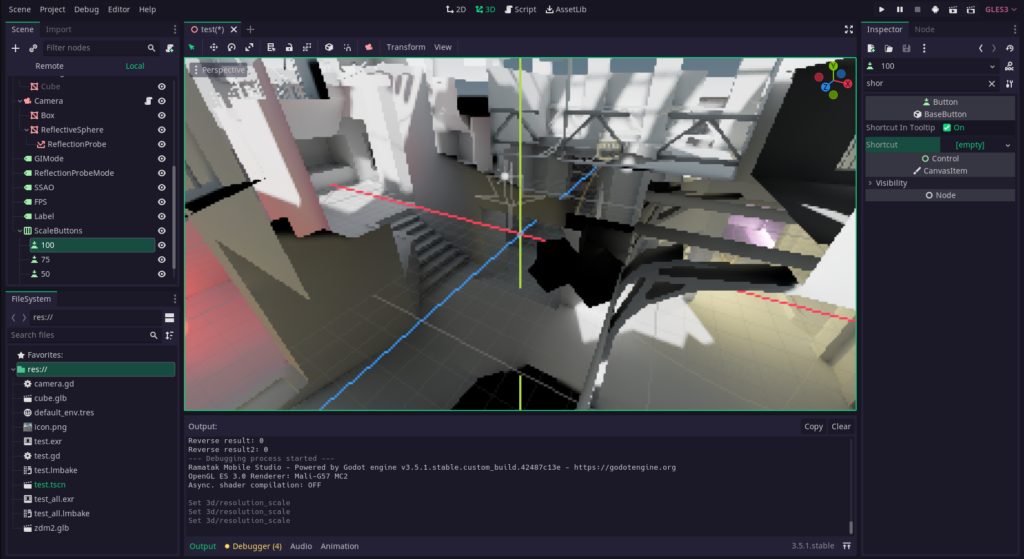
Let’s do a quick example to demonstrate this. Add four buttons to the scene, as shown in the following image:
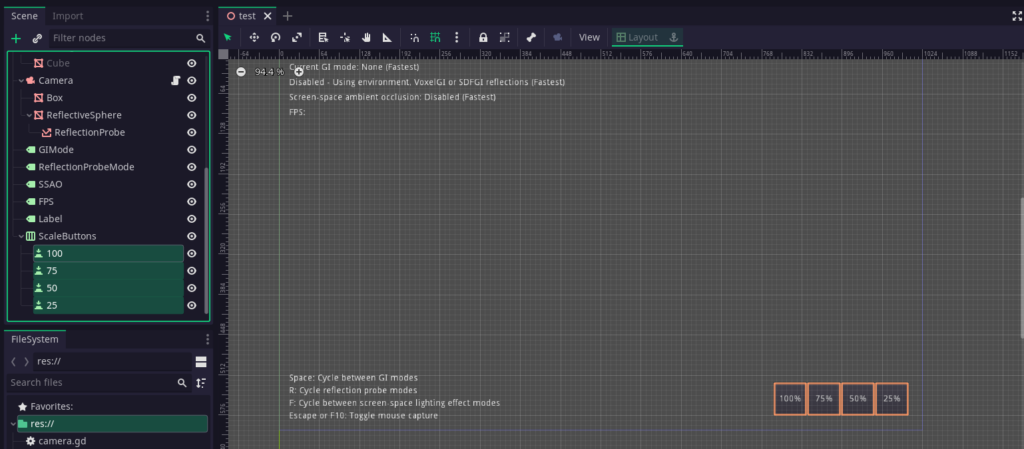
We are going to use those buttons to set a predefined resolution scale to the running game.
Add the following snippet to the test.gd script:
func change_resolution_scale(new_scale: float):
	ProjectSettings.set_setting("rendering/quality/3d/resolution_scale", new_scale)
To keep it simple let’s connect the buttons’ pressed signal to the method we just created in the _ready() of the script:
	$"ScaleButtons/100".connect("pressed", self, "change_resolution_scale", [1.0])
	$"ScaleButtons/75".connect("pressed", self, "change_resolution_scale", [0.75])
	$"ScaleButtons/50".connect("pressed", self, "change_resolution_scale", [0.5])
	$"ScaleButtons/25".connect("pressed", self, "change_resolution_scale", [0.25])
Remember the fourth parameter of the connect function is the extra parameters that will be passed to the method we are connecting to.
Note that we are adding buttons because we want to run this on a mobile device with a touch screen. As the project captures your mouse, you won’t be able to press the buttons on desktop platforms, but you can add some shortcuts to the buttons if you wish to test it.
These buttons we added could be included in an options menu so the player can select the best scale for them.
If you have a 7″ xdpi phone, you will likely not notice a major quality decrease in 75% or 50% scale, because the screen is very small, but the performance will surely experience a boost!
Changing the resolution scale automatically
Let’s do a simple experiment. Imagine we want to change the resolution, not by choice of the player, but depending on how the game is performing. We could check the FPS the game is running at for some seconds, and if the average value on that time is less than a minimum, we can downscale the resolution to improve performance.
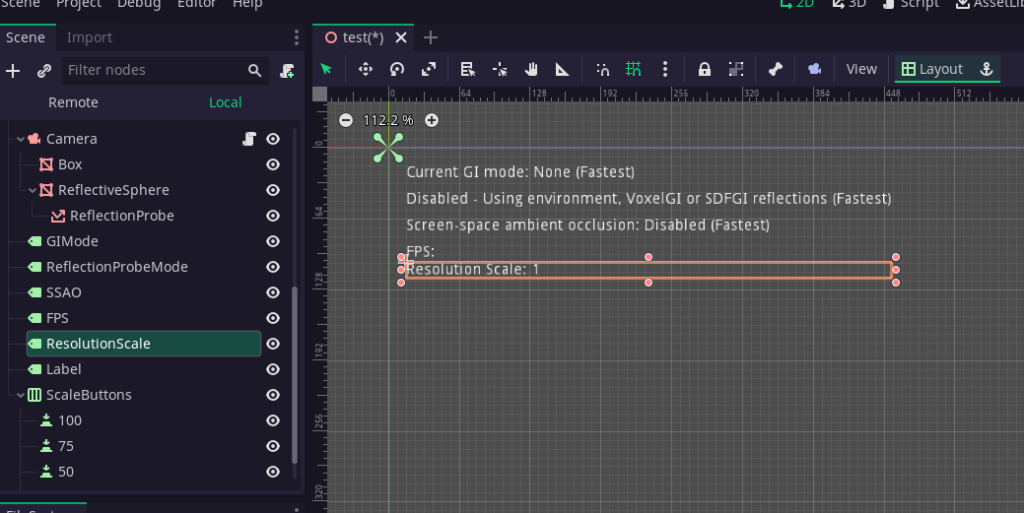
First, go ahead and add another label to the UI, so we can know which is the current resolution scale. Add it as it is shown in the image below:
Then, we need to define some constants at the top of the script:
const min_fps := 55.0
const max_fps := 66.0
const min_scale := 0.25
const rescale_interval := 1.0
Instead of defining a target FPS value, we can use min_fps and max_fps to define a range. We won’t change the resolution scale if the average FPS value is within this range.
We also want to avoid scaling the resolution down to a point where the game looks bad, so we define a min_scale to clamp the scale value.
Lastly, we define the time interval at which we are performing the change of scale.
Lets now add some variables we are going to use to change the scale:
var fps_sum := 0.0
var fps_sum_n := 0
var time_since_last_rescale := 0.0
On each frame, we will add the current FPS value to fps_sum, and the delta to time_since_last_rescale. We will also increase fps_sum_n by 1.
When time_since_last_rescale is greater than rescale_interval, it means is time to do the rescaling. At that moment we can calculate the average FPS value as fps_sum / fps_sum_n, and compare it with the desired range.
If the average value is outside the defined range, we are going to increase or decrease it by a small amount and just wait until the next rescale interval.
The resulting code is as follows:
const min_fps := 55.0
const max_fps := 66.0
const min_scale := 0.25
const rescale_interval := 1.0

var fps_sum := 0.0
var fps_sum_n := 0
var time_since_last_rescale := 0.0

func _process(_delta):
	var fps := Engine.get_frames_per_second()
	$FPS.text = "FPS: %d" % fps

	fps_sum += fps
	fps_sum_n += 1

	time_since_last_rescale += _delta
	if time_since_last_rescale > rescale_interval:
		time_since_last_rescale = 0.0
		var avg := fps_sum / fps_sum_n
		fps_sum = 0.0
		fps_sum_n = 0

		var new_scale = ProjectSettings.get_setting("rendering/quality/3d/resolution_scale")

		if avg < min_fps:
			new_scale /= 1.1
		elif avg > max_fps:
			new_scale *= 1.1

		new_scale = clamp(new_scale, min_scale, 1.0)

		ProjectSettings.set_setting("rendering/quality/3d/resolution_scale", new_scale)
		$ResolutionScale.text = "Resolution Scale: %s" % str(new_scale)
Now run the game again on your phone, and check the scale is changing automatically!
Note that if you have a high-end phone, you may need to change the range to note any change, as is possible that your phone can already handle the demo at full scale.
Changing resolution scale on specific viewports
With this new feature, you are also able to change the resolution scale on each viewport.
To test this let’s add a viewport at the top of the scene, with a Camera child node.
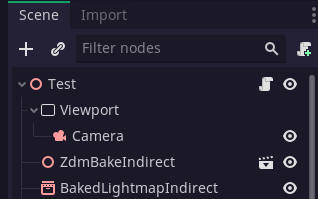
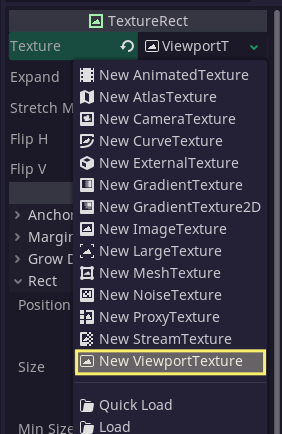
Set the viewport width to 200, and its height to 120in the inspector. We want to render what this camera is looking at in a texture, so also add a TextureRect alongside the rest of the UI elements. In the texture field in the inspector, assign it a new ViewportTexture, and choose the recently added viewport in the dialog:
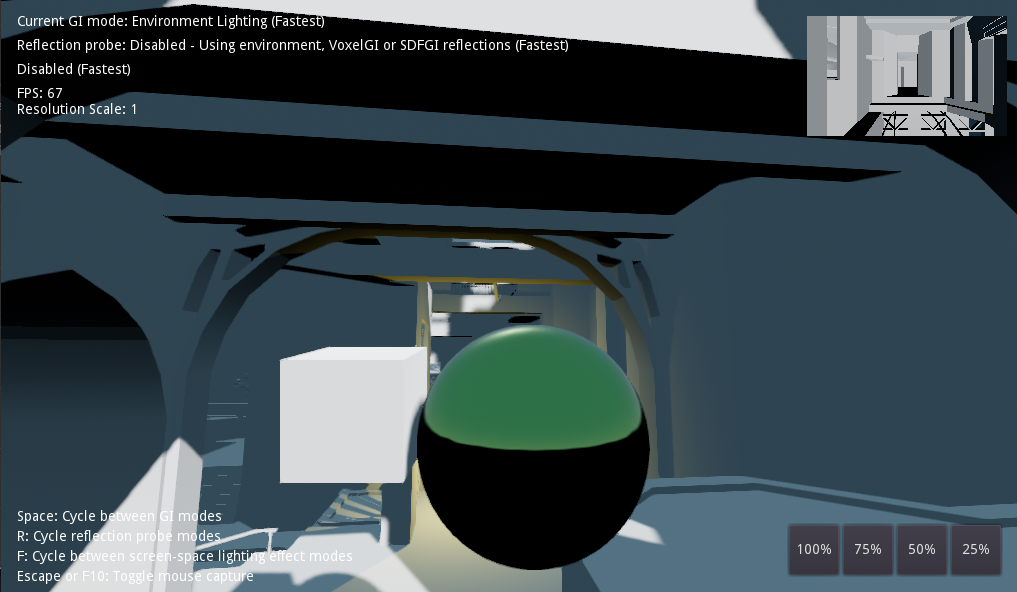
The TextureRect should take its size automatically from the viewport size. Place it in the right top corner. You should see something like this when you run the game:
There are three important attributes added by this new feature. The first one is resolution_scale_factor. You can set it to any value between 0 and 1. This value will be multiplied by the Resolution Scale you set in the project settings. So if you set viewport.resolution_scale_factor = 0.5, and in the project settings, the resolution scale is set to 0.8, the viewport will end rendering at 0.5*0.8 = 0.4 resolution.
You can avoid multiplying by the scale on the project settings by making use of the second attribute: resolution_scale_mix. Setting this attribute to false on a viewport will make it not take into account the resolution scale from the project settings.
By default, the viewport will use the same filter as in the project settings, but you can override it with the third attribute this feature adds: resolution_scale_filter. You can leave it to default, or change it to Viewport.RESOLUTION_SCALE_FILTER_NEAREST or Viewport.RESOLUTION_SCALE_FILTER_LINEAR.
For testing purposes, let’s add the following snippet to the _ready() function:
	$Viewport.resolution_scale_factor = 0.1
	$Viewport.resolution_scale_mix = false
	$Viewport.resolution_scale_filter = Viewport.RESOLUTION_SCALE_FILTER_NEAREST
Run the game on your mobile device once again and you will note how the viewport will have a constant scale of 0.25 regardless if the resolution scale is changing.