
Godot tutorial: Extending Godot Engine
Introduction
Godot Engine is a very complete general-purpose game engine. It has plenty of features that enable the user to create almost any kind of game with it. However, in most medium to large projects, you will need to either add something you are missing or something that makes your workflow more straightforward.
For these occasions, Godot provides many ways to extend the engine and editor features, allowing you to customize your way of developing games and tailoring it to a better experience for you and your team.
This blog post intends to present a summary of the basic concepts you need to know if you are looking into extending Godot Engine.
Know your objective
To decide what approach one should take when extending Godot’s functionality, first, you need to define what you want to achieve. Let’s do a summary.
- If you want to be able to do something that is not currently available in Godot, like for example accessing the mobile phone camera, using an external C++ library, or even writing a different rendering server, you probably want to do a Godot’s custom module.
- If you want to extend a Node’s functionality, but use a language different from GDscript or C#, you can use GDNative script in Godot 3.x. However, if you are on 4.x, you should make a GDExtension.
- If you want to add features not to Godot but to Godot’s editor, then you are looking for a Godot’s Editor Plugin. You can make these in GDScript, C#, or even using C/C++ through a Godot static module or GDNative script.
- Besides the previous statements, there are specific ways of making Android and iOS plugins.
Godot custom modules
Godot is made of modules. Many features that as a user we take for granted and may think that are part of Godot’s core are indeed modules. For example, when you import a gltf model, you are using the GLTF import and export module. RegEx class is also implemented through a module. Even GDScript and GDNative support is implemented through modules. Technically, you could build custom export templates removing any of these if you are not using them, and the game should still work the same.
If you need to make an extension that is deeply integrated with the engine, or you need to be able to interact with parts of the engine that are not exposed through the scripting API, then you need to make a custom module like those.
A great example of a custom module is the Voxel Module.
The advantages of doing a custom module are:
- Is the best approach in terms of performance.
- You are not limited to what is exposed through the scripting API.
- You don’t need to bundle your libraries with your binaries, everything will be integrated in the engine and export templates.
The process of making Godot modules is well documented, but here are some high-level steps that will give you an idea of what is involved in the process:
- You need to have the source code of the engine and be able to compile it.
- Create a new folder inside the
modules/directory in the source code, with the name of your module. You will create all your code there. - Add the code inside that folder, alongside two specific files to register your module:
register_types.handregister_types.cpp. Fill those files as stated in the official documentation. - Create a build file called
SCubso scons builds your code. The content of this file is also documented on the official site. - Add a
config.pyfile to configure the module, as it’s stated in the documentation. - Rebuild the engine and your module will be included!
If you want to do a module and need a more in-depth description, you can find a great example here.
GDNative
As opposed to custom modules, GDNative is mostly used to do scripting in a language different than C# or GDscript. When working with GDNative, you get all the features that are exposed to the scripting API, and thus, is a very powerful way to improve the performance of your behaviors. But GDNative is not only limited to that. If you want to add new features to the engine, and you don’t need anything else apart from what is exposed in the scripting API, then you can work with GDNative. If you want to add support to a specific language you like, you will probably also do it with GDNative.
Some cool add-ons implemented this way are the wwise and fmod integrations, the godot steam api, godot support for rust, to name but a few.
With GDNative, you build dynamic libraries that will be loaded as plugins by Godot.
Using GDNative instead of building a custom module has some advantages:
- You don’t need to rebuild the engine with your code. This makes it not only easier to iterate on the development but also easier to distribute your work to other people.
- The libraries you build work both for editor and export templates. This means you don’t need to build custom export templates.
- GDNative is not limited to C or C++.
Again, you can find examples of how to use GDNative in the documentation, but here we provide the high-level steps to get you started.
C GDNative scripts
- Get a copy of the godot headers. Place them in the root directory of your project.
- Check out the branch corresponding to the version of Godot you are using.
- Make your code in C. Follow the documentation to know how to proceed, as you need to add some predefined code there.
- Build your code using a C compiler.
- Create a
GDNativeLibraryresource with the libraries you built.
From there on you will be able to create NativeScripts using the library you built. You can get more information in this official example.
C++ GDNative scripts
- Get a copy of the godot-cpp repository.
- Build the C++ binding using Godot executable and scons.
- Write your code in C++. Again, follow closely the documentation to know exactly what to do.
- Build your plugin. You can use scons for this.
- Create the
GDNativeLibraryfile.
Now you can create a NativeScript using the library, and assign it to a node. Have in mind that in this case, your C++ code should define a class that inherits from one of the exposed nodes, and the native script will only be usable on that kind of node.
For more in-depth information about this, refer to this official tutorial.
Editor Plugins
Editor plugins are useful when you want to add features to Godot’s editor rather than to the engine. This way you can completely adapt the editor to your workflow and pipeline.
Something very neat about these plugins is that you can do them entirely in GDScript and inside the same editor. Forget about build systems, C/C++, libraries, and all of that. You just need to make scenes as you normally do, with some predefined boilerplate, and activate them as plugins.
Godot’s editor even provides a small dialog to help you get started, which you can find in the Project Settings under the Plugins tab.
With these kinds of plugins, you can:
- Create custom nodes. They will appear with the others in the dialog to add new nodes to a scene.
- Create custom docks, that can be freely placed alongside the built-in docs, like the inspector and Scene Tree explorer.
- Make customized UIs for the main screen, that will be available besides the 2D, 3D, and AssetLib tabs above the main viewport. These plugins will take the whole viewport when enabled.
- Define how certain files should be imported when added to a project.
- Create customized 3D gizmos.
- Customize the inspector for custom datatypes, or modify the behavior for built-in types.
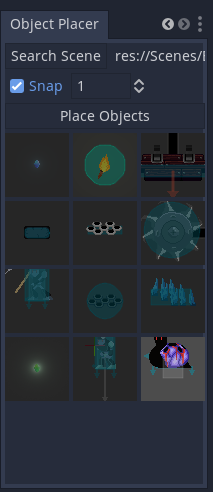
I’ve personally done some custom docks while working on my games, to help me adapt the editor to my needs. The following image shows a doc that lets you select PackagedScenes and place an instance in the currently open scene.
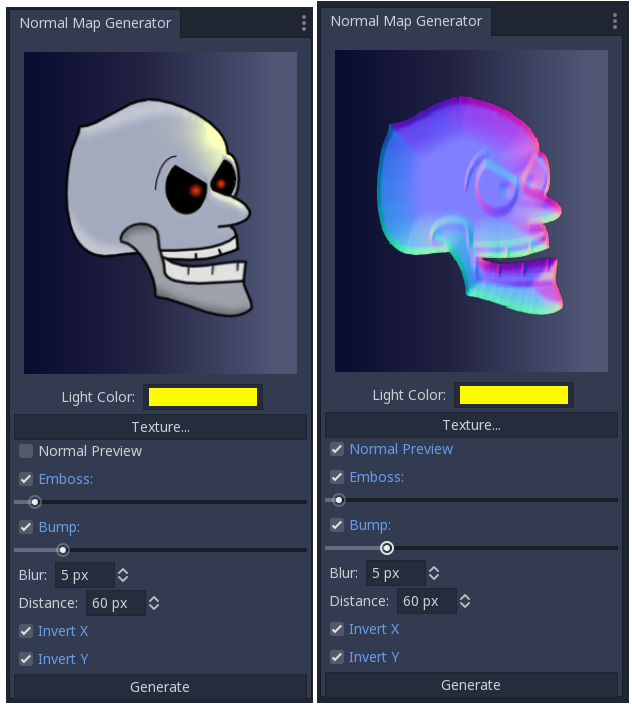
I also made some experiments with a dock that lets you generate and preview normal maps on sprites:
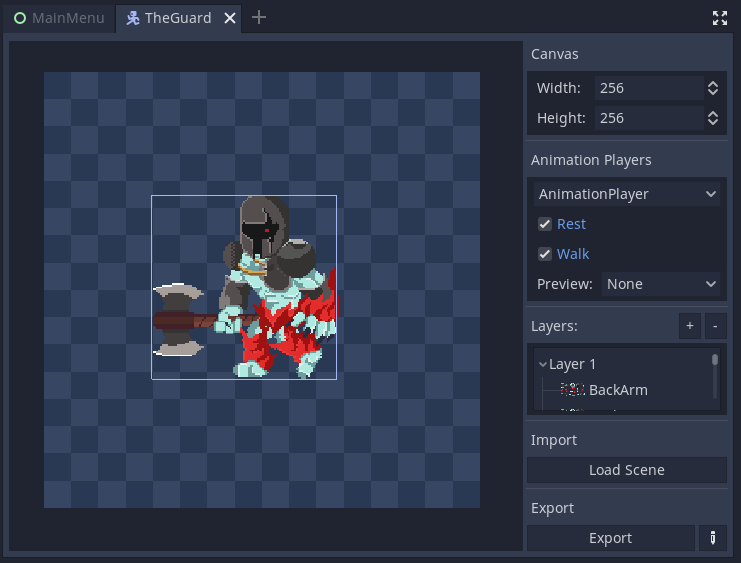
About main screen plugins, we made a tool that lets an artist block an animation using Godot’s cutout animation system, and export it as frame-by-frame animation to aseprite.
All of these plugins are available right in the editor while you work on your game, and are made with the same language and resources you make your games!
Android Plugins
Making plugins for Android has its own process. These plugins are useful for things from advertisement management, to cloud saves or push notifications.
The documentation has an excellent tutorial about this subject, but here we provide some high-level steps you need to do to make your plugins:
- Create an Android Library for your plugin.
- Add the Godot engine android library to the library project created in the previous step.
- Create a new class extending
org.godotengine.godot.plugin.GodotPlugin. - Update the
AndroidManifest.xmlfile. - Code the logic of your plugin.
- Create the corresponding configuration file.
After this, you only need to load and use the plugin in the editor.
A good example of an Android plugin is the official Google Play Billing plugin.
iOS Plugins
These plugins cover the same use cases as the Android ones. Again, the documentation has a good page on the subject, but we proved some high-level steps:
- Create an Objective-C library in XCode.
- Add the Godot header files as dependencies.
- Set the appropriate build configuration and configuration flags as stated in the docs.
- Program the logic of your plugin.
- Build a
.alibrary. - Create the configuration file.
You can also get this official godot iOS plugins if you are looking for examples.
Conclusion
The objective of this blog post was to summarize all the possibilities you have as a developer to extend Godot’s features. We also provide some very high-level information about making them, but the whole process for each case is very well documented. So instead of going in-depth into these subjects, we considered it would be better to link to the official documentation for each case. Think about this blog post as a resource where you have all the information in the same place.
In future posts, we plan to make more didactic tutorials of some specific cases.