Introduction to Using Cell Phone Sensors for 3D transformations
It’s a well-known fact that our mobile devices come equipped with all kinds of sensors used for various features that we tend to take for granted. For example, a phone knows if it’s held in portrait or landscape orientation, it knows if you’re walking in a certain direction, and it can even detect if you’ve left it on a table screen-up or screen-down. All of this information is calculated internally using various electronic sensors. But, as game devs can we make use of these sensors for our video games? The answer is yes, and it’s relatively straightforward.
In this Godot tutorial, you will learn how to use mobile phone sensors to control the transformations of objects in the Godot Engine.
You can get a demo project with two scenes to test the content of this tutorial on the Ramatak GitHub!
Scope of this Tutorial
This Godot tutorial will cover the following topics:
- Understanding the concepts of pitch, roll, and yaw in 3D space.
- Using the gyroscope to set the pitch, roll, and yaw.
- Using the accelerometer and magnetometer to set the pitch, roll, and yaw.
- Combining the gyrroscope, accelerometer, and magnetometer for better control.
Throughout the post, we will use these values to control the camera node of the scene.
Prerequisites for this Tutorial
To follow this tutorial you will need:
- Some knowledge of the Godot Engine.
- A mobile phone with gyroscope, magnetometer and accelerometer.
- Basic math skills (trigonometry mainly).
- Basic physics knowledge.
- Ramatak Mobile Studio (automatically setup for exporting to Android) or Godot 3.5.1 set up to export to Android.
Setting up the Project
The project required for this tutorial is simple. Just use a Spatial node as the root of your scene, and add a Camera node to it. You should also add some meshes to have as a reference for when we start moving the camera. Your base project should look something like this:

A First Approach: The Gyroscope
We’re going to use sensors to orient the camera in our game. To do this, we need to understand some basic definitions of camera rotation. With the axis convention used in the Godot Engine, we can define the following:
- Pitch: rotation around the x-axis.
- Roll: rotation around the z-axis.
- Yaw: rotation around the y_axis.

Our goal is to determine these three parameters using our cellphone sensors.
Let’s start by looking at the gyroscope. A gyroscope gives us the angular velocity in radians per second (rad/s). This means that the sensor tells us how fast the device is rotating on each axis. As we know from basic physics, multiplying velocity by elapsed time gives us the distance traveled in that time. The same principle applies to angular velocity: multiplying it by elapsed time gives us the change in angle in that time. Godot makes it easy to get this value with its Input system. So let’s use this to get the pitch for our camera.
Add a script to the camera with the following code:
extends Camera

var pitch: float = 0.0

func _physics_process(delta):
	var gyroscope: Vector3 = Input.get_gyroscope()
	pitch += gyroscope.z * delta

	rotation.z = pitch
Run your project now on your device, and move it around. You will notice that the camera moves accordingly!
So lets complete the previous script for roll and yaw:
extends Camera

var pitch: float = 0.0
var roll: float = 0.0
var yaw: float = 0.0

func _physics_process(delta):
	var gyroscope: Vector3 = Input.get_gyroscope()
	pitch += gyroscope.x * delta
	roll += gyroscope.z * delta
	yaw += gyroscope.y * delta

	rotation = Vector3(pitch, yaw, roll)
Try it again and see that now you can freely rotate your camera to inspect the scene! You can now control the orientation of your camera using your mobile phone. Great! But we’re not done yet.
If you played around enough with the previous code, you will soon note that if the roll is π/2, yaw and pitch stop working as desired. This is because, in the object coordinates, if roll = π/2, the yaw should be considered around the x-axis since this is the axis parallel to the earth now. Similarly, the pitch should now be considered around the y-axis. This can be fixed by applying the roll also to the gyroscope data:
var gyroscope: Vector3 = Input.get_gyroscope().rotated(-Vector3.FORWARD, roll)
Note: Remember that in Godot Vector3.FORWARD is a vector pointing in the opposite direction of the z axix.
So, are we done now? Unfortunately, no…
Gyroscopes are cool sensors, but they have a problem: they tend to drift. If you move your camera around a lot and then put your phone in the same orientation it had when the game started, likely, you won’t get the same view as when the game launched.
Using the Accelerometer for Pitch and Roll
The accelerometer is a sensor that, measures acceleration in units of m/s². In a rest position, accelerometers will measure the 9.81 m/s² in the direction to the center of the earth caused by gravity. This makes them useful to detect the orientation of a device relative to the earth.
Godot provides two measurements with the accelerometer:
Input.get_accelerometer(): gives you the sensor values in each axis.Input.get_gravity(): gives you the values but only takes into account gravity.
The latter is better for measuring pitch and roll.
We can use the gravity value to get the pitch and the roll, but we won’t be able to get the yaw as the gravity resultant is always parallel to the y-axis.
If you don’t care much about the math, just use this code and skip the next section:
func _physics_process(delta):
	var gravity: Vector3 = Input.get_gravity()
	roll = atan2(-gravity.x, -gravity.y)
	gravity = gravity.rotated(-Vector3.FORWARD, rotation.z)
	pitch = atan2(gravity.z, -gravity.y)

	rotation = Vector3(pitch, yaw, roll)
Math Justification
Trying to not go very deep with math, this picture is provided to help visualize the situation, which assumes that the roll is equal to 0 (the x-axis is parallel to the ground) and only considers the z and y axes.
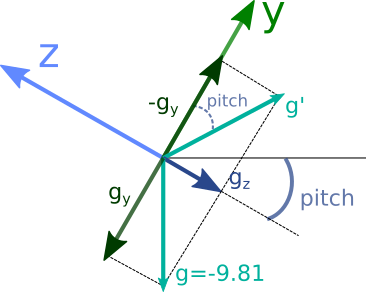
The picture shows the local axes of the device when some pitch is applied. By definition, the pitch is the angle between the horizontal and the z-axis (i.e. the rotation around the x-axis). The magnitudes and represent the gravity measurements in those axes, as read by the accelerometer. The resultant gravity should always be a vector pointing downwards with a magnitude of approximately 9.81 m/s².
By inverting gy, we can get g‘, and using trigonometry, it can be seen that the angle between -gy and g‘ is equal to the pitch. This angle can be calculated using the formula atan2(gravity.z, -gravity.y).
To account for cases when roll is not equal to 0, the gravity vector needs to be rotated by the roll value, which can be done using the code gravity = gravity.rotated(-Vector3.FORWARD, rotation.z).
The formula for the roll value can be obtained through a similar analysis, and is given by roll = atan2(-gravity.x, -gravity.y).
Using the Magnetometer for Yaw
To determine the yaw, we use the magnetometer. This sensor measures the magnetic fields and is capable of detecting the direction of the north pole due to the earth’s magnetic field. By considering it as an accelerometer that points towards the north, we can calculate the yaw value in a similar way than we did for roll and pitch:
yaw = atan2(-magnet.x, magnet.z)
However, there are two factors to consider when calculating yaw. First, we need to rotate the readings from the magnetometer to take the roll and pitch into account.
var magnet: Vector3 = Input.get_magnetometer().rotated(-Vector3.FORWARD, rotation.z).rotated(Vector3.RIGHT, rotation.x)
yaw = atan2(-magnet.x, magnet.z)
Secondly, to align the yaw value with the world coordinates in our game, we need to calculate an initial yaw value and subtract it from all subsequent calculations. The resulting script is:
extends Camera

var pitch: float = 0.0
var roll: float = 0.0
var yaw: float = 0.0

var initial_yaw : float = 0.0

func _ready():
	yield(get_tree(),"idle_frame")
	var magnet: Vector3 = Input.get_magnetometer()
	initial_yaw = atan2(-magnet.x, magnet.z)

func _physics_process(delta):
	var magnet: Vector3 = Input.get_magnetometer().rotated(-Vector3.FORWARD, rotation.z).rotated(Vector3.RIGHT, rotation.x)
	var gravity: Vector3 = Input.get_gravity()
	roll = atan2(-gravity.x, -gravity.y)
	gravity = gravity.rotated(-Vector3.FORWARD, rotation.z)
	pitch = atan2(gravity.z, -gravity.y)
	yaw = atan2(-magnet.x, magnet.z)

	rotation = Vector3(pitch, yaw - initial_yaw, roll)
Note: you need to wait for a frame before getting the magnetometer reading in _ready(), otherwise it will return Vector3.ZERO.
We achieved our camera movement using another approach, but this method is not perfect either. As previously mentioned, gyroscopes have drift issues, but magnetometers and accelerometers aren’t a silver bullet either: they have noise. If your sensors are cheap as mine, you will notice the camera orientation is not smooth at all, particularly in regards to yaw.
Gyroscopes have little noise but a lot of drift, and magnetometers and accelerometers have little drift but a lot of noise. Fortunately, mathematical techniques allow us to combine the benefits of both sensors, providing a better solution!
Improvement Using the Three Sensors
There are several methods for combining the readings from the three sensors to get a more accurate estimation of orientation values. However, for our purposes, the simplest solution will suffice.
We can get roll, pitch, and yaw from both the gyroscope and the accelerometer/magnetometer. By taking a weighted average of these values, we can mitigate the drift from one measure and the noise from the other. For example, to calculate the roll value, we can use the following code:
roll = k (roll + gyroscope.z * delta) + (1-k) * roll_accHere, k is a constant between 0 and 1, and roll_acc is the roll value calculated with the accelerometer. A value of k close to 1 will result in the gyroscope being primarily used to calculate the roll while in motion, with the accelerometer “correcting” the estimation over time, especially while stationary. This is known as a complementary filter.
There is one final challenge: the roll calculated with a gyroscope can increase without bonds, but the one calculated with the accelerometer is limited to the range [-π, π]. This can result in “jumps” in the values when the gyroscope’s roll exceeds π, as the accelerometer will then report a value near –π.
Godot comes to the rescue again! The complementary filter is essentially a linear interpolation between the two values, and Godot has a function specifically designed to interpolate between angles while wrapping them correctly. This function is lerp_angle() and in this case, we can use it like this:
roll = lerp_angle(roll_acc, roll + gyroscope.z * delta, k)
With this in mind, the final code results in:
extends Camera

var pitch: float = 0.0
var roll: float = 0.0
var yaw: float = 0.0

var initial_yaw : float = 0.0

var k : float = 0.98

func _ready():
	yield(get_tree(),"idle_frame")
	var magnet: Vector3 = Input.get_magnetometer()
	print(magnet)
	initial_yaw = atan2(-magnet.x, magnet.z)

func _physics_process(delta):
	var magnet: Vector3 = Input.get_magnetometer().rotated(-Vector3.FORWARD, rotation.z).rotated(Vector3.RIGHT, rotation.x)
	var gravity: Vector3 = Input.get_gravity()
	var roll_acc = atan2(-gravity.x, -gravity.y)
	gravity = gravity.rotated(-Vector3.FORWARD, rotation.z)
	var pitch_acc = atan2(gravity.z, -gravity.y)
	var yaw_magnet = atan2(-magnet.x, magnet.z)

	var gyroscope: Vector3 = Input.get_gyroscope().rotated(-Vector3.FORWARD, roll)
	pitch = lerp_angle(pitch_acc, pitch + gyroscope.x * delta, k)
	yaw = lerp_angle(yaw_magnet, yaw + gyroscope.y * delta, k)
	roll = lerp_angle(roll_acc, roll + gyroscope.z * delta, k)

	rotation = Vector3(pitch, yaw - initial_yaw, roll)
And that’s it! With this method, you can now control the Camera or any other node that inherits from Spatial using the sensors in your phone. The possibilities for creative game design with the Godot Engine are endless! Have fun experimenting with this technique.