Godot Project Organization Introduction for Unity Refugees – With Simple Example Game
So, you’re a game dev who tried using the Godot Engine over the weekend, for some reason, and you’re a little confused about how to put together your first Godot game? We’ve got you covered! In this post I’ll show some more advanced Godot features, but in a very simple driving game format. Because learning is always best when it’s fun. Vroom Vroom!
Note that this driving “game” is not exactly playable, it’s just a simple example. And this article is not intended to be a beginner tutorial for Godot, it’s intended give you some organizational hints. If you are looking for some beginner tutorials check out the Godot Step-by-Step tutorial, and GDQuest’s excellent videos and courses.
In this article I will show you:
- Directory structure
- How to combine scenes and nodes
- Where to attach scripts
- The often overlooked magic powers of import scripts
I will not be going too deep into detail on how exactly the game is put together, you can find the sources on our Github!
WASD for controls, F for full-screen, and space to brake!
High-level overview
The top-level directory looks as follows:
-rw-r--r--. 1 hp hp  163 Sep 18 04:18 default_env.tres
-rw-r--r--. 1 hp hp  876 Sep 18 04:12 export_presets.cfg
drwxr-xr-x. 3 hp hp   60 Sep 18 04:18 gridmaps
-rw-r--r--. 1 hp hp 2709 Sep 17 18:55 icon.png
-rw-r--r--. 1 hp hp  874 Sep 17 19:52 icon.png.import
drwxr-xr-x. 2 hp hp   79 Sep 17 23:22 import
-rw-r--r--. 1 hp hp 2777 Sep 18 04:08 project.godot
drwxr-xr-x. 5 hp hp   61 Sep 18 04:18 scenes
drwxr-xr-x. 2 hp hp   35 Sep 18 04:12 utils
At this level we basically only have directories, the icon, and project.godot. The files ending in .import are generated by Godot to steer the importing process. These should be checked into source control, but the .import directory should not be.
In the scenes/ directory we have the following structure:
car
car/source
car/car.gd
car/car.tscn
level
level/decoration
level/decoration/buildings
level/decoration/foliage
level/Level.tscn
camera
camera/camera_pivot.gd
camera/camera_pivot.tscn
game.tscn
For this relatively simple game we have all of our game logic, such as it is, in ‘game.tscn’. Let’s have a look at the scene structure:
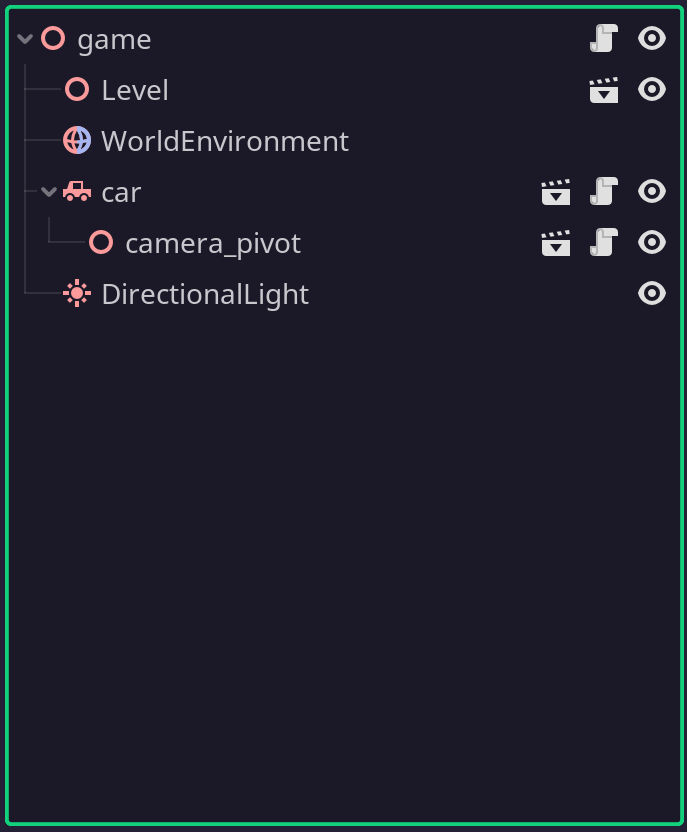
The “game” scene brings together the various elements of our game. We have the Level, the WorldEnvironment, our car, the chase camera (attached to the car) and a DirectionalLight to cast shadows. Because in Godot scenes are nodes, the Level, car, and camera_pivot scenes all appear like every other node in a scene. You can tell when something is an instanced scene by the little clapperboard next to the node. The clapperboard can be clicked to open the instantiated scene.
Building a car (.tscn)
The car scene is itself also comprised of nodes:
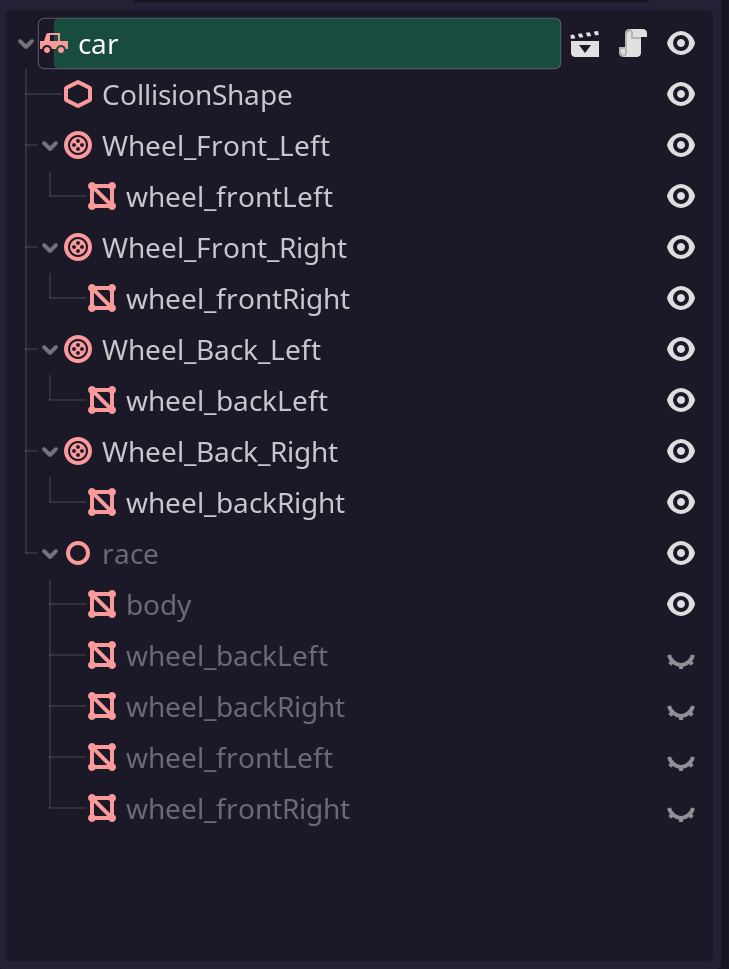
Each scene has a root node, the root node determines the type of the overall scene. That is why in the game scene the car showed up with the little car logo. That is because the root of the car scene is a VehicleBody node. Vehicle bodies require wheels, those are the wheel icons. They are of type VehicleWheel. You might notice that this scene has several “grayed out” nodes. These nodes are from imported nodes.
The way this scene was constructed is by creating an instanced scene straight from the glTF source file. We achieved this by changing the import settings for the race.glb file and setting the “Root Type” to VehicleBody.
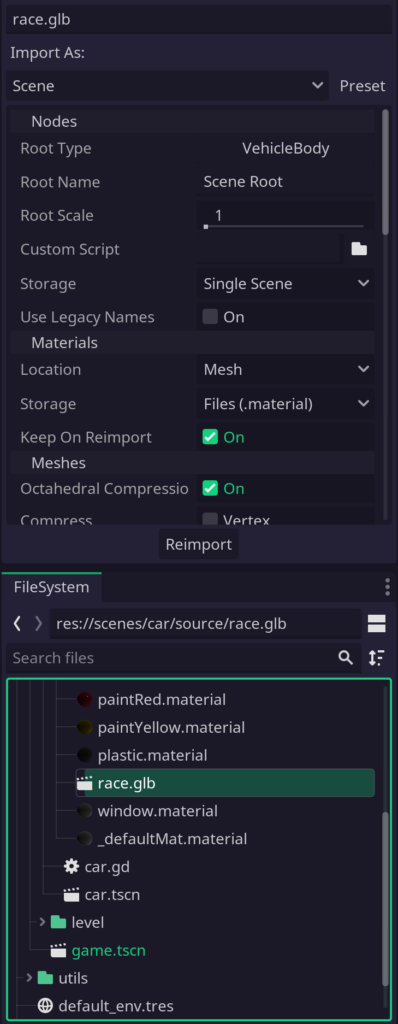
Now Godot will treat the GLB file itself as if it were a Godot scene, and when instantiated it will have the desired root node. We can then save an instantiated scene as a .tscn file and make our edits. In this case I’ve added the wheels, moved the wheel meshes as children of the wheel nodes, and centered their transforms.
We probably want to be able to steer the car, so we’ll attach a script. I’ve used the following rather simple steering logic:
extends VehicleBody

export var steer = 0
export var max_torque = 500
export var max_rpm = 500

func _physics_process(delta):
	steer = lerp(steer, Input.get_axis("right", "left") * 0.4, 5 * delta)
	steering = steer

	var acceleration = Input.get_axis("brake", "accelerate")
	var left_rpm = abs($Wheel_Back_Left.get_rpm())
	$Wheel_Back_Left.engine_force = acceleration * max_torque * ( 1 - left_rpm / max_rpm )

	var right_rpm = abs($Wheel_Back_Right.get_rpm())
	$Wheel_Back_Right.engine_force = acceleration * max_torque * ( 1 - right_rpm / max_rpm )

	if Input.is_action_pressed("handbrake"):
		brake = 10
	else:
		brake = 0
At the top you see extends VehicleBody this tells GDScript what type of node the script is attached to. In this case it is a VehicleBody this means that the script has access to all of the methods and fields of that type. This is why we can get away with simply writing steering = steer as steering is a field of VehicleBody. This makes it really quick and easy to write behaviors for nodes.
You will also note that we can easily get to child nodes with the $ notation. We read and set values in the back wheels by referring to them by name. Because of this system it is very easy to reuse this script on other cars. Simply setup another model with wheels named the same, and attach the script file. This script is called car.gd and it sits next to car.tscn in the scenes/ directory.
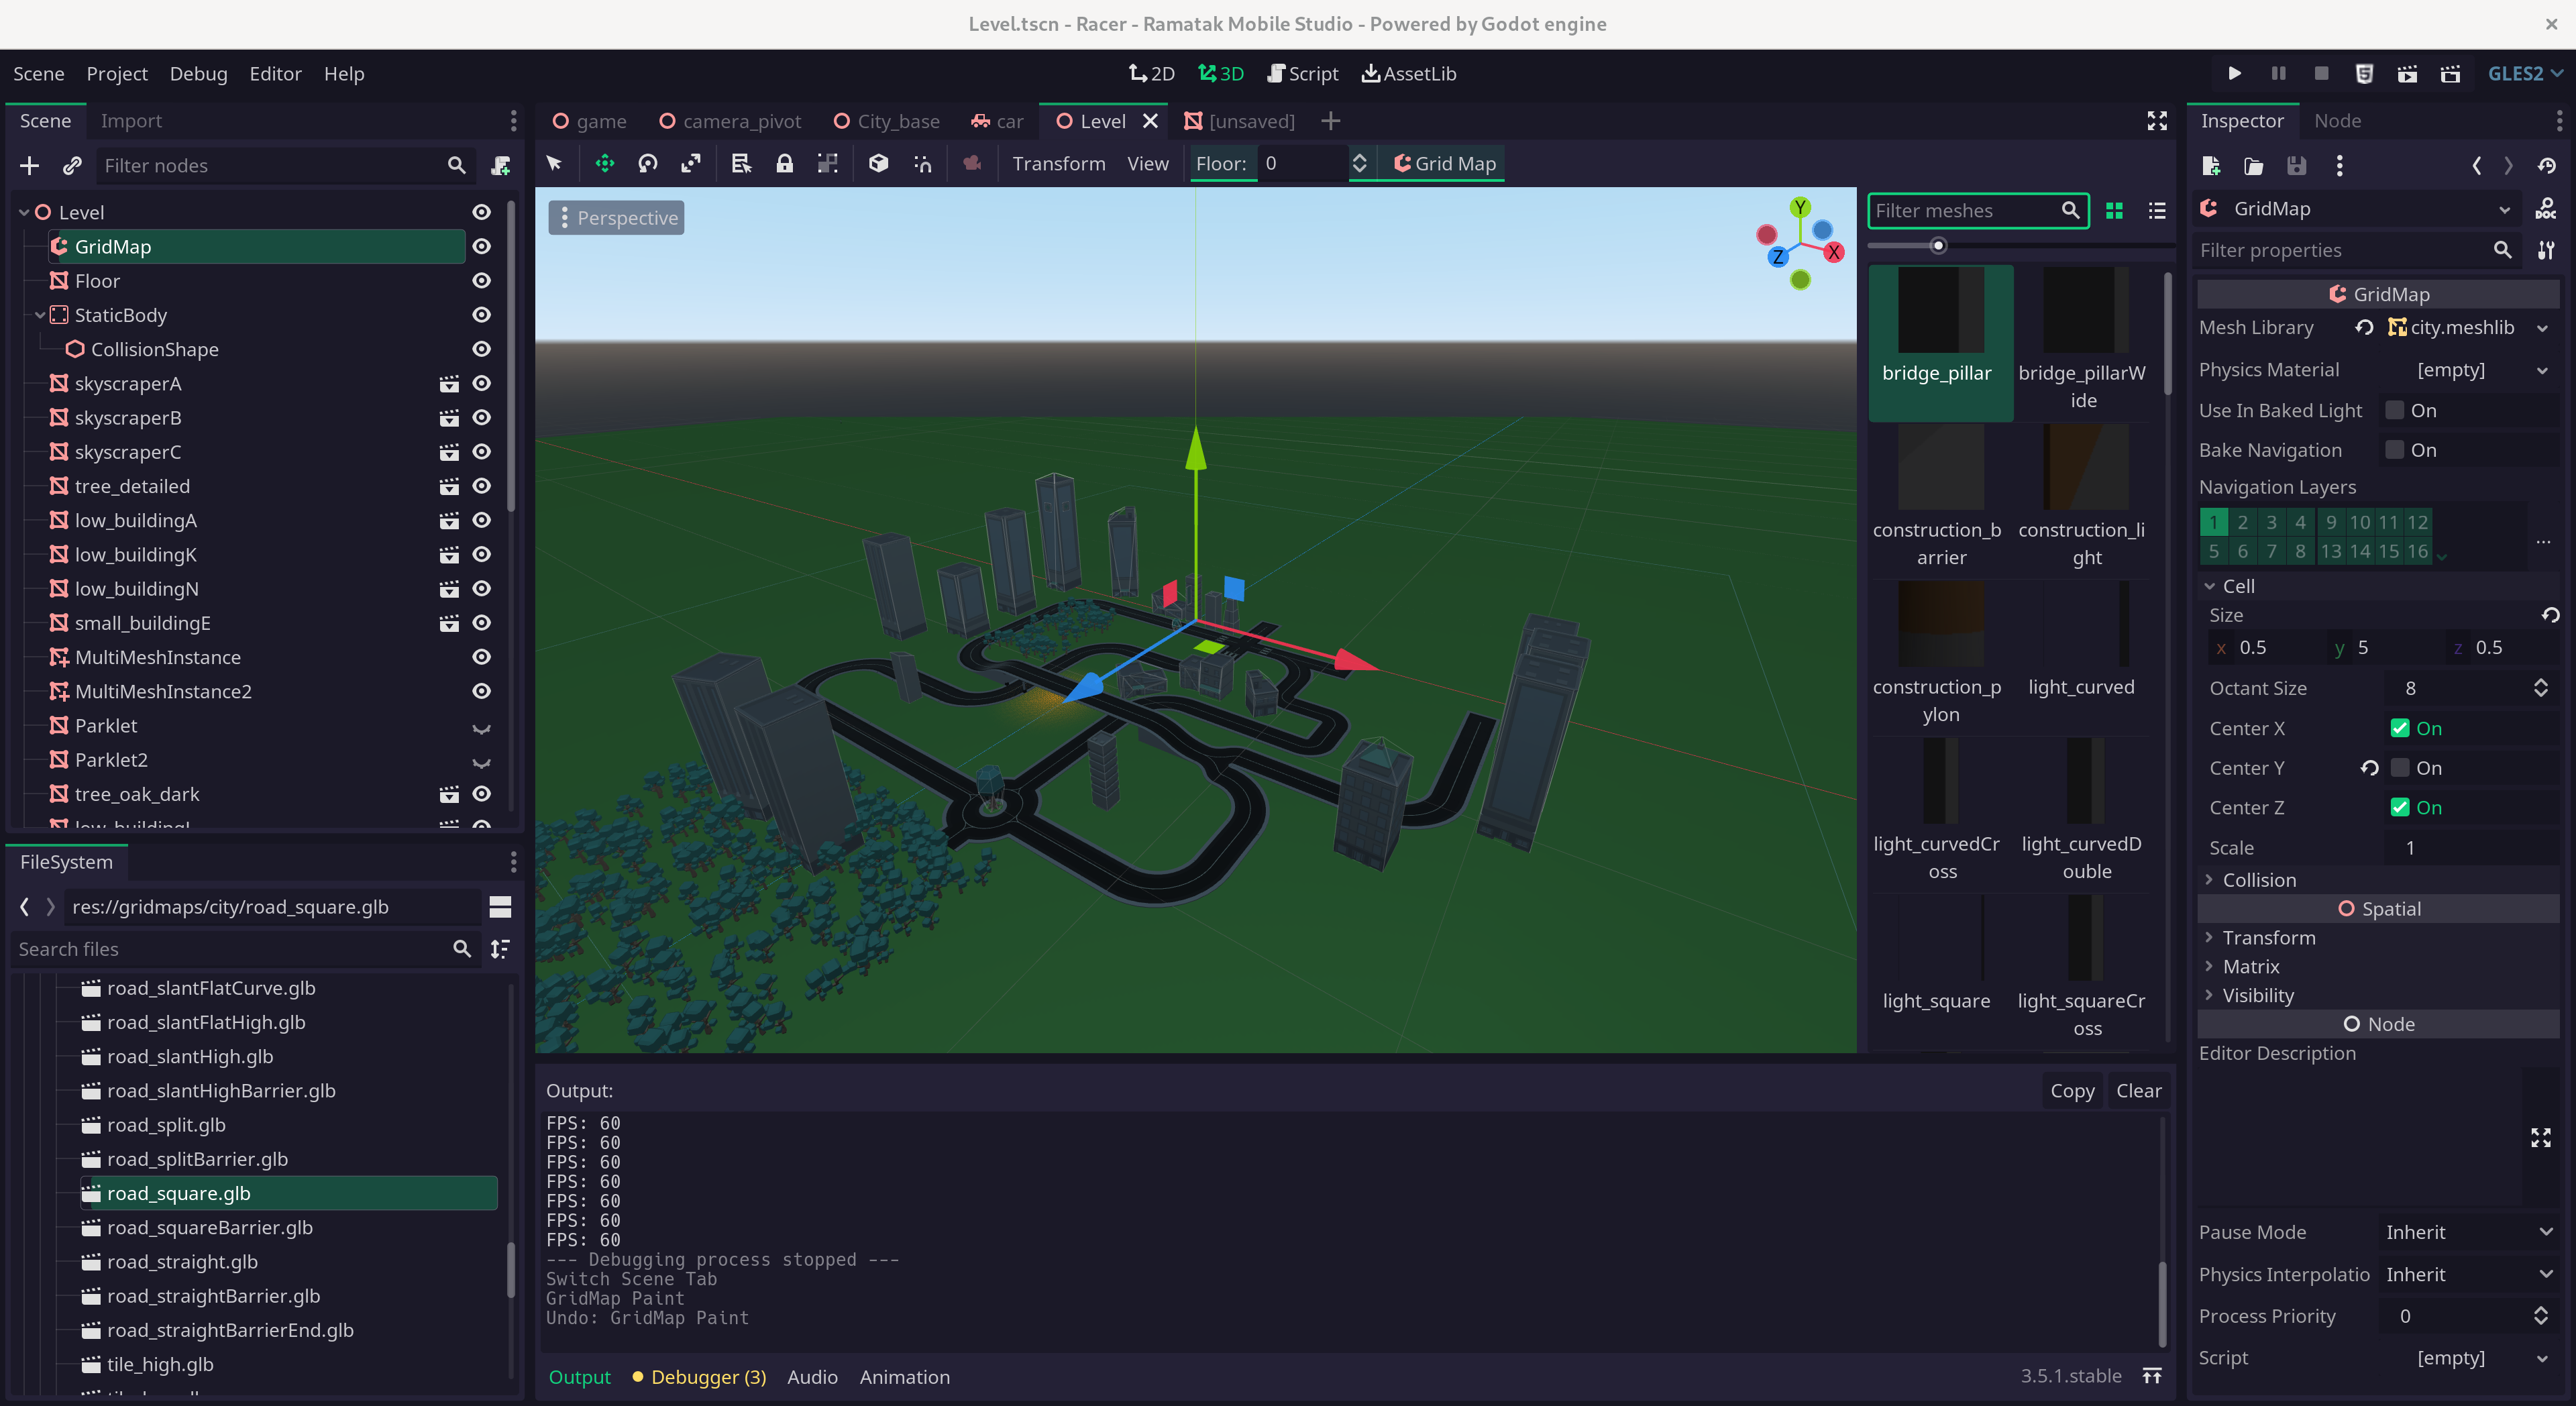
Creating a level
For this level I decided to use a GridMap to quickly paint some roads using this amazing pack from Kenney. To help make this process a little quicker I use an import script to quickly generate the collider mesh for the tiles:
tool
extends EditorScenePostImport

func post_import(_scene):
	var i = find_mesh_instance(_scene)
	_scene.mesh = i.mesh # Set the root's mesh to the imported Mesh

	for n in _scene.get_children(): # Delete all children generated by the importer
		n.free()

	_scene.create_trimesh_collision() # Create our new collision children

	for n in _scene.get_children():
		n.set_owner(_scene) # Because the scene was never instantiated we need to tell Godot who owns the new nodes
		for l in n.get_children():
			l.set_owner(_scene)
	return _scene

func find_mesh_instance(node):
	for n in node.get_children():
		if n is MeshInstance:
			return n

		return find_mesh_instance(n)
This script runs right after the importer has imported the source glb file, but before the scene is written. What this allows us to do is reform the scene to our liking. GridMaps need a MeshLibrary to function. This library can include other types of nodes, such as colliders, but the root must be the MeshInstance that contains the drawable mesh. We can simply select all of our tile GLB files and set their import settings:
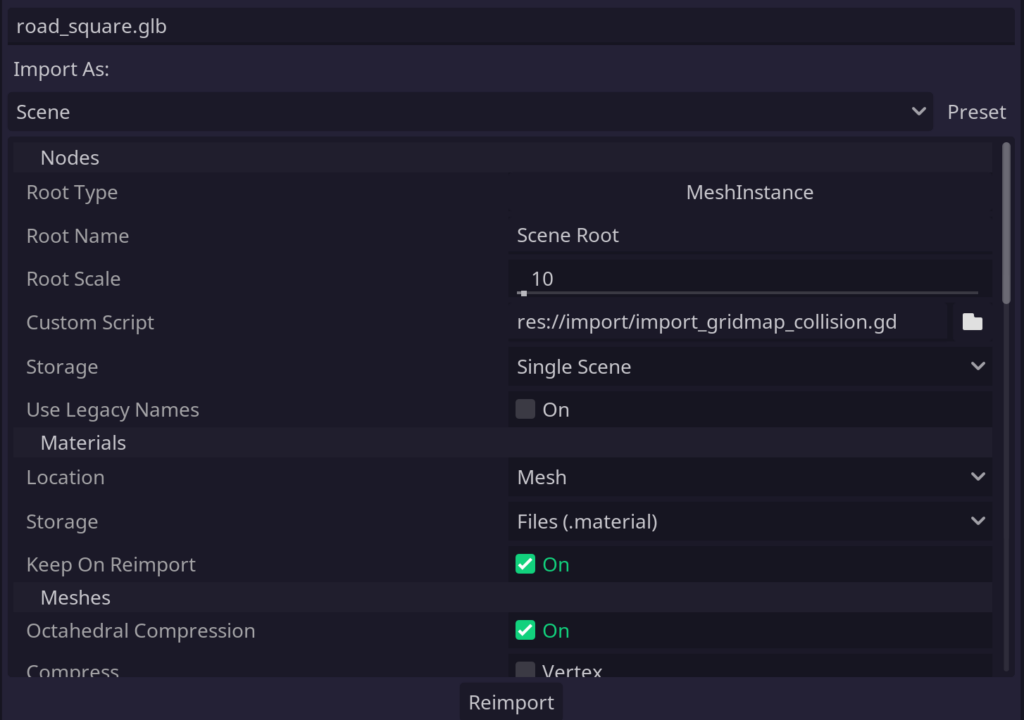
This can also be done by selecting multiple source files! After this just press the “Reimport” button and the scenes will be reimported. The resulting scene tree is as follows:
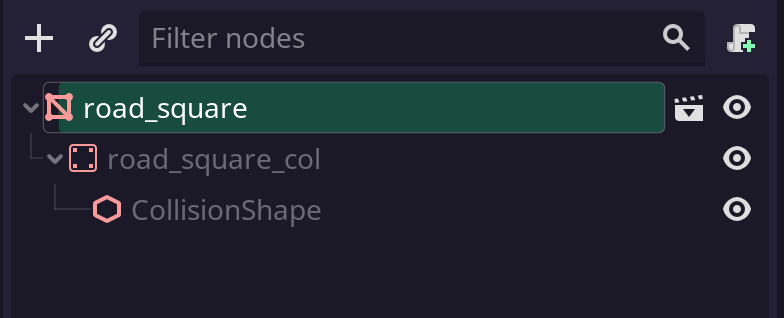
This was exactly what we wanted! Because of the scene system, the Gridmap can now draw our road tiles and they will include colliders. We can now convert all of our nodes into a MeshLibrary by instantiating all of our newly imported glb files, then converting those to a new MeshLibrary:
Something similar was done for all the buildings, but instead of creating a trimesh collision, a simple box collision was generated.
Constructing a camera
The camera scene is created in such a way that it could be a child of any node (or scene). The scene structure is quite straightforwards:
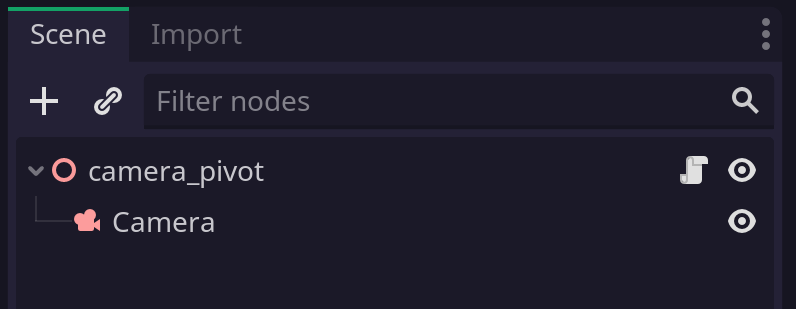
And so is the script:
extends Spatial

var current_direction = Vector3.FORWARD
export (float, 1, 10, 0.1) var smoothing = 2.5

func _physics_process(delta):
	var current_velocity = get_parent().get_linear_velocity()
	current_velocity.y = 0
	if current_velocity.length_squared() > 1:
		current_direction = lerp(current_direction, current_velocity.normalized(), smoothing * delta)

	var look_direction = current_direction.normalized()
	var x = look_direction.cross(Vector3.UP)

	global_transform.basis = Basis(x, Vector3.UP, -look_direction)
Note that the script is placed on the pivot Spatial node! The script queries its parent, which in this case is whatever node it itself is attached to. In our game.tscn it is attached to the car.
In conclusion
Godot’s powerful scene system makes it very easy to create reusable components, and build more complex behaviors out of simpler pieces. The addition of import scripts makes wrangling imported assets much easier if their structure doesn’t meet your needs. Scripts attached to root nodes of scenes allow you to easily check the parent scene once the scene is used, like is done with the camera.
Don’t forget to check out the code in our Github repository, and feel free to ask questions on Twitter or Mastodon!
And a big thank-you again to Kenney for his amazing assets!